spice up your campsite cooking with wild ginger

today’s wild edible profile is one of my favorites, we’ll be taking a look at wild ginger (specifically, western wild ginger).

this one took me a while to find for the first time since it’s got a number of common lookalikes, and it grows low to the ground so it’s often hidden by other larger plants, but once you find it you’ll start spotting it everywhere! the entire plant is edible, although the leaves and flowers can be quite bitter, so we’re really only interested in its long, trailing roots. let’s take a look at the basic info.

wild edible profile: western wild ginger

western wild ginger (asarum caudatum)

habitat:

typically found in moist conifer forests of the pacific northwest. I found these specimens in an old-growth forest on the Olympic Peninsula.

edible parts:

entire plant, but only the roots are tasty

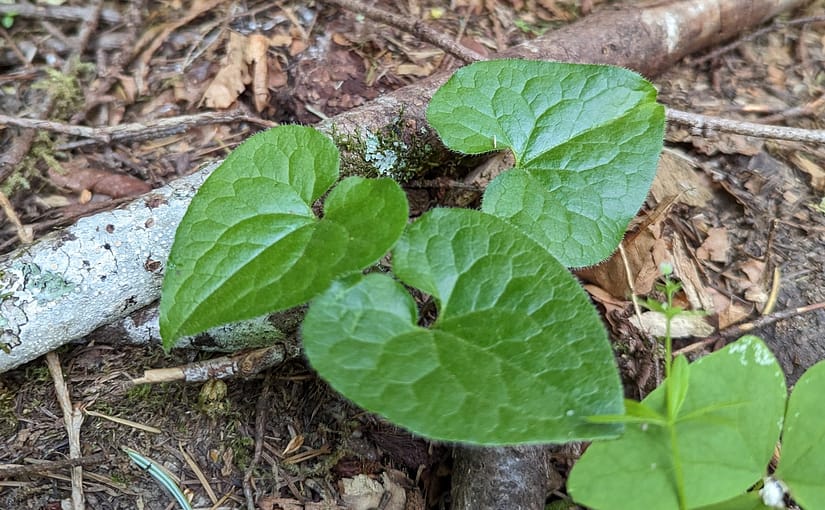
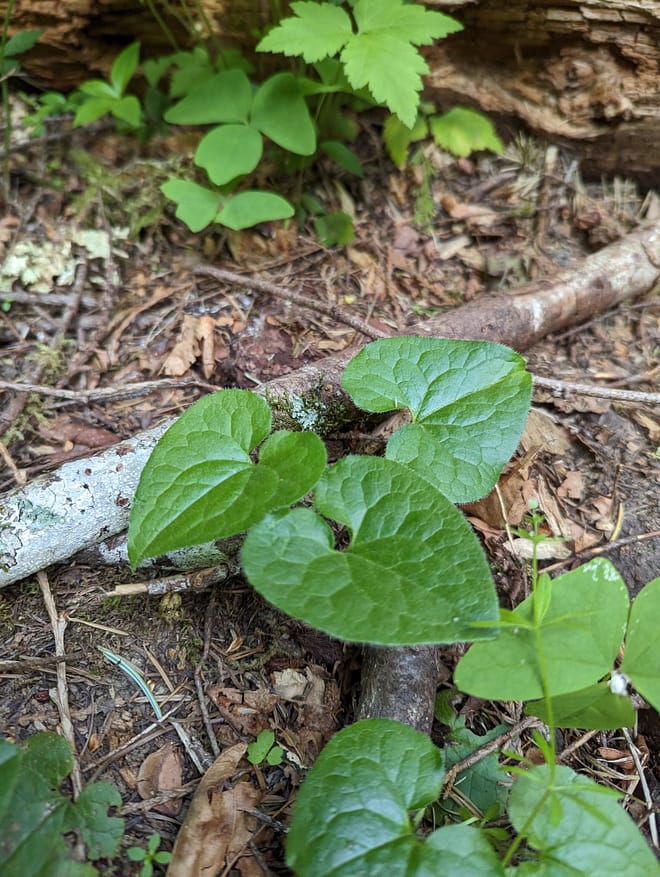
wild ginger makes a beautiful groundcover with its heart-shaped leaves and growth habit of spreading wide – so in addition to being delicious, it’s a great choice to add to a no-grass lawn as well (I’ve just put some in my own yard this year!).

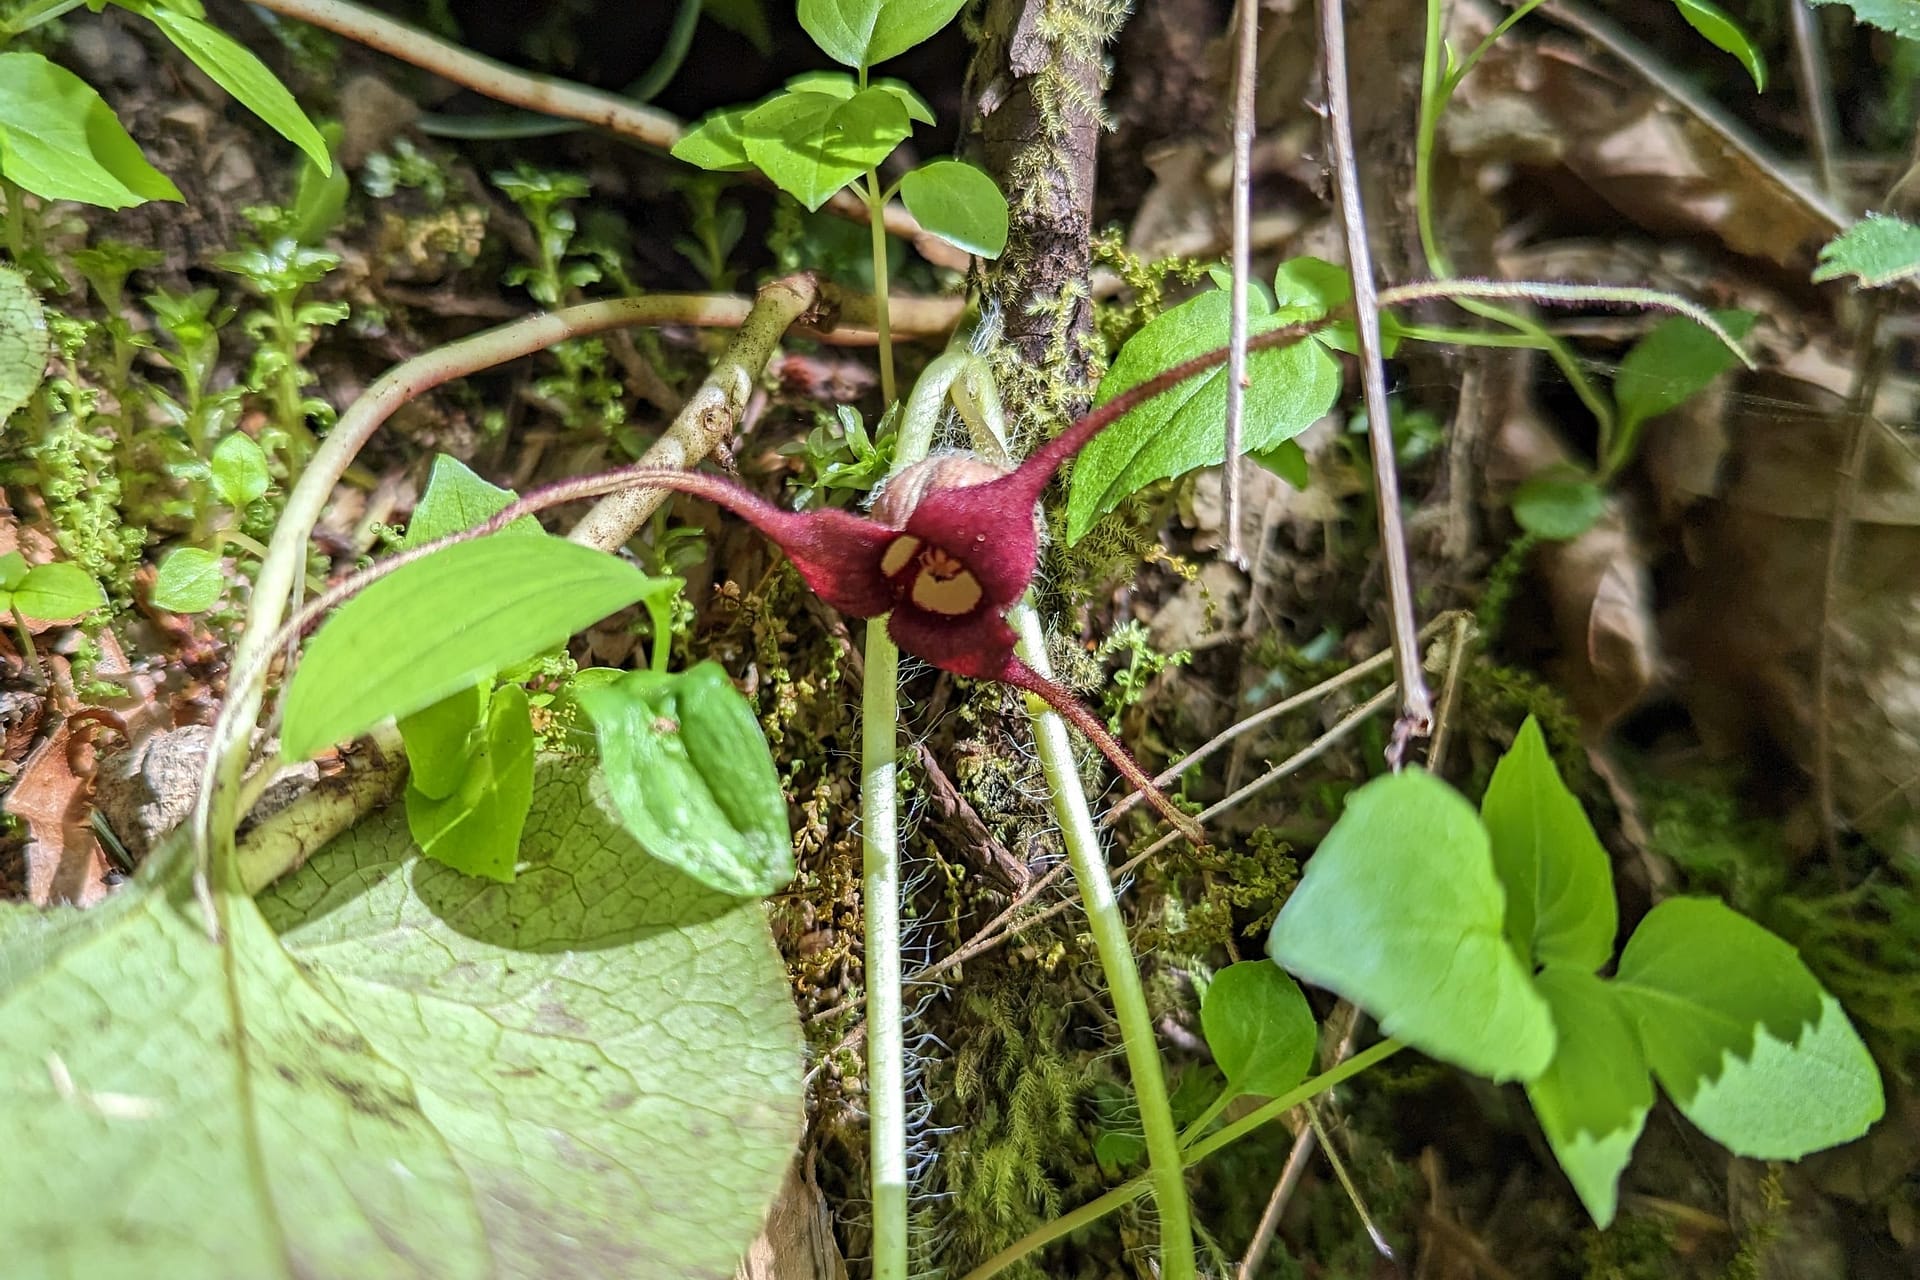
if you’re lucky, you might see it in bloom – the flowers are unusual looking with long, skinny tapered tips on each of the three petals. they can be hard to spot since they usually grow underneath the leaves, so you’ll have to search low to the ground to find one. they grow this way because one of the ways wild ginger reproduces is by attracting certain types of ants to crawl up inside the flower and carry the seeds away towards their nests.

but the main way wild ginger reproduces is by spreading its long, trailing rhizomes (underground roots) and sprouting new plants as it grows. this is good news for us, since that’s the part we want to eat! ๐Ÿ™‚ the rhizomes of wild ginger grow very shallowly, sometimes barely covered by any dirt at all, so it’s very easy to harvest. before you go pulling up plants with heart-shaped leaves though, let’s take a look at some similar-looking plants you might mistake it for.

how to forage for wild ginger

wild ginger has two main lookalikes you’ll often see growing in the same habitats. the first and most common one that you’ll see a lot of is false lily of the valley.

just like wild ginger, these have heart-shaped leaves and grow low to the ground in clusters. they’re a beautiful groundcover as well, and while they can be eaten, they don’t really taste like much. you’ll also want to be careful not to confuse it with true lily of the valley, which is very toxic to people and pets alike. luckily, true lily of the valley rarely grows in the same habitat as the false variety (and likewise, rarely with wild ginger).

the easiest way to tell apart wild ginger from either lily of the valley is simply to look at the leaves. false lily of the valley has shiny, glossy leaves with perfectly straight lines running from stem to tip. compare this to wild ginger’s matte, leathery-textured leaves with their branching, fractal-like grooves, and you shouldn’t have trouble telling the difference!

another key difference that you’ll easily notice in spring and summer is the presence of small white flower clusters poking up from the leaves. as mentioned earlier, wild ginger’s blooms are purple, three-petaled, and grow low to the ground underneath the leaves, so if you see white flowers, you’ll know you’re looking at a false lily of the valley.

another possible lookalike to wild ginger is bunchberry, also called creeping dogwood. like false lily of the valley, the leaves are brighter green and somewhat shiny, but there’s a number of immediate giveaways that we’re looking at a different plant. first, you’ll notice that bunchberry leaves always grow in symmetrical patterns, and they’re missing the telltale heart-like notch at the base of the leaf.

and of course, there’s the flower in the center of each bunch! these pretty little flowers bloom in spring and develop into a clump of red berries later in the summer. they’re totally edible and delicious, so if you see some, don’t skip out on them – but we’ll cover those in another post later on.

finally, all of these lookalikes have one more important giveaway – none of them smell like ginger ๐Ÿ™‚ when harvesting wild ginger rhizomes, snap one in half and give it a whiff – it’ll smell crisp and spicy just like the ginger you might buy at the grocery store. once you know what to look for (and smell for), you’ll be finding wild ginger all over the place.

cooking with wild ginger

now for the best part, time to eat! I love finding wild ginger when I’m out camping because it’s a delicious and versatile ingredient to add to just about anything you might be cooking at your campsite. you can use it just like you would any other kind of ginger. chop it up finely, since the texture can be a little woody if you leave the pieces too large, and toss it in a pan to let it get crispy and aromatic before adding it to whatever else you’re cooking (we made fried rice!).

if you don’t feel like cooking, wild ginger also makes an excellent tea (either dried or fresh) and is said to help with stomach aches. or if you’re feeling fancy, the roots can be candied by cooking them in sugar water for a crunchy, spicy snack.

and that’s about all there is to it! I hope you have good luck finding wild ginger on your next hike and get a chance to try it out ๐Ÿ™‚

wild edible recipe: toasted couscous with nettle pesto & roasted radishes

Stinging nettles are an intimidating plant to forage for, but they’re worth the trouble, I promise! My favorite thing to do with a bag of nettles is to make them into a pesto, it makes an insanely delicious and versatile ingredient.

This recipe combines the nettle pesto with one of my other favorite (but little-known) ingredients: roasted radishes. Honestly, it’s kind of criminal how few people know how delicious and juicy radishes get when you cook them. Toss a handful of radishes with a drizzle of olive oil in the oven for a short while, and they lose a lot of their sharp bite, but gain a ton of flavor in return. Trust me on this one – after you try this dish, you’ll be roasting radishes for every meal.

How to Forage for Nettles

common nettles (urtica dioica)

also known as:

stinging nettles, burn weed, burn hazel

habitat:

originally native to europe and asia, now found worldwide

edible parts:

entire plant

hazards:

skin contact causes an unpleasant itchy/burning sensation

Choosing the right gloves

Let’s get the tough part out of the way first – how the hell do you pick these things without being in utter misery the entire time?

Gloves. Yes, it’s that easy…. almost. There’s some things you should know when picking out the right pair.

I’ve tried foraging for nettles with a few different types of gloves, and from my experience you do not want to use a standard pair of gardening gloves. These are usually made of a knit fabric, which means lots of tiny holes. They might have reinforced fingertips, but the backs of your hands are going to get stung like crazy through all those little holes in the fabric, and you won’t be happy.

Another option that I’ve found doesn’t work all that well are those sterile vinyl disposable gloves, which you might have around the house for cleaning. These work alright when you start, but they’re prone to ripping easily. And they usually stop at the wrist, leaving your forearms unprotected.

So what does work? Well, you’ll want to choose a glove that has all of the following factors:

  • Non-porous
  • Sturdy, doesn’t rip easily
  • Covers forearms

For me, I’ve found that the two options which fit the criteria best are either a pair of long rubber cleaning gloves (the kind that goes all the way up to your elbow, usually for dish washing), or some leather work gloves. You can get elbow-length work gloves like this at most hardware stores.

Identification

Nettles are kind of a plain-looking plant, so you might struggle to identify them at first among all the other leafy shrubs and bushes all around. Here’s a couple of things to look for.

Clumps of small, green, fuzzy-looking fruits. May also have clusters of white or purple flower buds.

Broad leaves with deep grooves and wide, serrated toothed edges

Tips of the leaves extend much longer than the other “teeth”

Stem is stiff and orange to reddish in color, with visible hairs

You got stung, now what?

The sting of nettles is unpleasant, but for most people, not dangerous. Allergic reactions to nettles are possible, however. So do be careful and if you think you may be at risk of a reaction, maybe avoid this plant altogether. If you are stung and feel any tightening of the chest or throat, call your emergency phone line immediately.

For most folks, a nettle sting is nothing more than an irritant. It’ll be uncomfortable and itchy, but mostly you’re stuck waiting it out. Mild stings usually only last for about 15 minutes or so before fading. Over-the-counter allergy medications containing antihistamines can help it to go away faster as well.

Even though a sting will be quite itchy, do your best not to scratch it! The “sting” comes from thousands of tiny, hollow, needle-like hairs all over the plant which contain oils that cause a skin reaction. If you scratch, you’re likely to spread the oils to a larger area. If possible, wash the sting with soap and water as soon as you can.

It goes without saying, but of course the best remedy is just not to get stung in the first place ๐Ÿ™‚

Other harvesting tips

  • Bring along a sturdy bag made of a non-porous material to store your harvest in. I like to use compostable waste bags since they’re easy to roll up and stick in a pocket of my hiking backpack (although some are a little too thin and rip easily, so you may need to double-bag it).
  • Young nettle leaves taste best, so avoid any leaves that look stiff or browned. For this reason, it’s usually best to forage for nettles in the springtime, since you’ll have way more new leaves to choose from. You can definitely find a good harvest later in the season, though – you might just need to be a little more choosy with which leaves you pick.
  • Since nettles are often undesirable plants and are fast-spreading, there are no real concerns of overharvesting this plant. So fill up your bag to your heart’s content!

Recipe

Toasted Couscous with Nettle Pesto and Roasted Radishes

Ingredients

  • For the pesto:
  • 1/2 lb (200g) fresh nettle leaves
  • 4 tbsp olive oil
  • 3 cloves garlic
  • Salt and freshly ground pepper, to taste
  • For the couscous:
  • 2 lb (800g) red radishes
  • 1 tbsp olive oil, divided
  • 2 cups dry pearl couscous
  • 2 tbsp lemon juice
  • 1/4 cup pickled banana peppers
  • 3 cloves garlic
  • Shaved parmesan, to garnish

Directions

  1. Preheat the oven to 400F (200C).
  2. De-sting the nettles: Bring a large pot of water to a boil and add the nettles (don’t touch them with your bare hands!). Stir until wilted and fully submerged. Cover and cook for 3-4 minutes, then remove from the pot and drain. The nettles are now safe to touch. Rinse them briefly in cold water to cool them off, then squeeze them to wring out as much water as you can.
  3. Make the pesto: Roughly chop the cooked nettles along with 3 gloves of garlic, and add to a food processor. Pulse until finely chopped, then add the 4 tbsp of olive oil along with a good pinch of salt and some freshly ground pepper. Continue processing until well incorporated and no large leaves remain. Adjust seasoning to taste, and add additional olive oil if needed.
  4. Prepare the radishes: Wash the radishes and trim off the ends, then cut into quarters (or halves, if they’re very small). Toss radishes with 1/2 tbsp olive oil plus some salt and pepper, and spread out on a baking sheet. Roast in preheated oven for 20 minutes, taking them out halfway through to flip/toss for even cooking.
  5. Make the couscous: In a medium saucepan, add the remaining 1/2 tbsp of olive oil and bring to medium-high heat. Add the couscous and toss to coat in the oil. Continue toasting, stirring frequently, until the couscous is lightly browned. Add about 3 cups of water and bring to a boil. Cook until al dente (about 8 minutes).
  6. Prepare the toppings: While the couscous is cooking, thinly slice the remaining 3 cloves of garlic, and roughly chop the pickled peppers. Add just a dash of olive oil to a small pan over medium heat, and briefly saute the peppers and garlic to soften them – just a minute or two.
  7. Putting it all together: When the couscous is finished, drain any remaining water and return it to the pot. Stir in the nettle pesto and the 2 tbsp lemon juice until well coated. Taste and add more salt, pepper, or lemon juice as needed. Dish up the couscous and top with a big scoop of roasted radishes. Sprinkle the garlic and pepper mix on top along with a scant handful of shaved parmesan, and serve.

Notes

  • If you can’t find pearl couscous, a small pasta such as orzo can be a decent substitute

wild edible recipe: fireweed tea

fireweed (chamaenerion angustifolium)

also known as:

great willowherb, bombweed

habitat:

temperate climates, often in barren or disturbed soil such as areas recovering from wildfire

edible parts:

flowers, leaves, and stems

Fireweed was one of my first successful foraging harvests. I’d been spending a lot of time at a cafe where they sold fireweed tea, and it was one of my staple choices when I didn’t know what else to order. It’s a delicious, balanced tea – dark but not tannic or bitter; sweet but not cloying; and it has just a slight hint of something I can’t really describe that makes me think of campfires in the summertime. So when I discovered it grows natively all over the pacific northwest, I couldn’t wait to try making fireweed tea myself. It sounded fun, plus “free” is a hell of a lot cheaper than $8 an ounce or whatever they charge for it at a specialty tea shop.

If you’re looking for fireweed in your area, your best bet is to check places where the soil has been disturbed by fire or forestry. The common name “fireweed” might make you think of the 420 variety, but it has nothing to do with it. The name comes from the fact that it’s often one of the first plants to begin growing again after a wildfire, often prolifically since nothing else has started to grow in its way yet1sometimes fields of fireweed even are planted intentionally after prescribed fires to help restore the soil and prevent erosion! neat ๐Ÿ™‚. In the UK it’s sometimes called “bombweed” for a similar reason – it was common to see fields of it growing where bombs had fallen during WWII. Nowadays you’ll also often see fireweed growing along roadsides and highways, in open meadows, forest edges, and lots of other places. It’s happy to grow just about anywhere, and there isn’t any concern of overharvesting – the main thing to look out for is to pick a clean specimen. Avoid picking up roadside plants that are drenched in smog from vehicles, or might’ve been sprayed with pesticides.

identification

Identifying fireweed is easiest in the mid to late summer, after the characteristic pink-purple flowers have begun to bloom. It grows tall – sometimes up to 8 or 9 feet (2.5-3m) – so it’s usually easy to spot. Each fireweed plant is composed of a central stalk with long, narrow leaves sticking straight out from it.

When it’s in bloom, the top of the stem will transition from leaves into bright pink flowers, making it even more noticeable. If you’re hunting for it earlier in the summer, you’ll just see clusters of pinkish-white buds.

lookalikes

There’s not much risk of confusing fireweed with another plant as long as you’re paying attention, but two that might look similar from a distance are purple foxglove and lupines.

The key differentiating factor for Foxglove is the flowers: they’re noticeably larger and bell-shaped, instead of fireweed’s small, narrow blooms. They also tend to hang only on one side of the stalk, instead of being evenly distributed all the way around.

For Lupines, you’ll want to look at the leaves. While they are also somewhat long and narrow, the leaves are in separate bunches on multiple stems instead of one central stalk. You’ll also often notice small fuzzy looking pea pods growing on top, since lupines are part of the pea family.

harvesting & edibility

Most of the fireweed plant is edible, though I don’t really recommend eating it raw2if you do, choose young leaves and stalks. older leaves will be tough and not as flavorful. The most common preparations are to ferment the leaves as a tea, or (apparently, as I found out while writing this post) to use the flowers to make a jam. I’ll have to try that sometime.

For tea purposes, just grab a stalk and run your hand down it to remove the leaves. I usually get a mix of young and old leaves, since the younger ones tend to be sweeter, so if you only go for those you’ll end up with a much sweeter tea. If you prefer that though, go for it – and grab some flowers while you’re at it, since those can be tossed in with the leaves and will add a significant amount of additional sweetness as well. Personally I find it sweet enough already though, so I stick with just leaves. Read on for the recipe.

recipe: fermented fireweed tea

Ingredients

  • freshly harvested fireweed leaves (optionally, flowers too – see notes)

Directions

  1. Clean: Rinse to remove any dirt or debris, and dry thoroughly. A salad spinner works great, or you can pat dry and spread the leaves out on a drying rack for a little bit
  2. Ferment: Prepare some clean jars or storage containers with lids to contain the fireweed while it’s fermenting. Taking leaves a handful at a time, tear them a few times and then crush and roll them in your palms to get them to release as much of their natural oils as possible. Add the crushed leaves to the prepared containers and seal the lids. Place them in a cool, dry location for 2-3 days.
  3. Dry: After a couple days fermentation, the containers should have a distinctly sweet scent when opened. (note: There should not be mold, though! if you do have mold, it’s likely that the leaves weren’t dried well enough after washing, and need to be tossed out). Spread leaves in a single layer in a dehydrator. Dry at 90F (32C) for about 4-6 hours or overnight, until leaves are completely dried and brittle.
  4. Store in an airtight container until ready to make tea.

Notes

  • If you like a sweeter tea, you can also add fireweed flowers to the mix. Treat them the same as the leaves.
  • 500 grams of leaves will result in approximately 100 grams of dried tea

footnotes

  • 1
    sometimes fields of fireweed even are planted intentionally after prescribed fires to help restore the soil and prevent erosion! neat ๐Ÿ™‚
  • 2
    if you do, choose young leaves and stalks. older leaves will be tough and not as flavorful

wild edible recipe: yarrow tea

common yarrow (achillea millefolium)

also known as:

yarrow, milfoil

habitat:

nearly everywhere except parts of africa and southern asia

edible parts:

entire plant

Yarrow is a plant that’s easy to recognize, it’s got these frilly feathery leaves that really don’t look like anything else that I can think of. Mature yarrow plants will also have bunches of little white flowers at the tops that look kinda like queen anne’s lace, but the ones I saw when I took the photos for this post were mostly younger plants, which just have these cute fuzzy balls of future flowers that haven’t bloomed yet.

You can find it pretty much anywhere across the world; it’s native to temperate areas in the northern hemisphere, but has been introduced in much of the southern hemisphere as well. It’s a hardy plant that doesn’t need much to grow, so you’ll often see it widespread in places that other plants have trouble flourishing in – like in sand or on rocky mountainsides. In many places it’s considered invasive, so you don’t need to worry about overharvesting it.

The good news about yarrow is that the whole plant is edible. The bad news is you probably don’t want to. It’s bitter stuff, and has this strong medicinal sort of smell to it. Yarrow is a common ingredient in traditional medicine, and still today there are a lot of claims out there about different health applications of it. But that’s not the kind of forager I am, so we’ll just skip that part, yeah?

Medicinal claims aside, I’ve definitely heard the words “yarrow tea” used in a positive way before, I think. And I like to try everything even if it seems like a bad idea1especially if it seems like a bad idea, so I have prepared yarrow tea before. Here’s how I made it and what I thought about it.

Yarrow tea recipe – the short version

recipe: dried yarrow tea

Ingredients

  • freshly harvested yarrow leaves

Directions

  1. Rinse thoroughly to remove any dirt or debris. Dry in a salad spinner if you have one, or just pat dry with a clean towel.
  2. Strip the frills from each leaf stem. They should come off easily by just grasping the stem tightly and running your fingers down it.
  3. Spread yarrow leaves in a single layer in a dehydrator. Dry at 90F (32C) for a few hours or overnight, until leaves are completely dried and brittle.
  4. Store in an airtight container until ready to make tea.

Yarrow tea recipe – the long version

Usually when I pick something I haven’t tried before, I start with the good old scratch-and-sniff technique. It releases all the oils in the leaf, so it’s a good way to get the “essence” of a plant. When I did this with yarrow, I got smacked in the face with a strong, bitter smell. This tempered my expectations a lot of the final result, so I didn’t pick a whole lot of it. Just one or two small plants.

I gave the leaves a good rinse, but didn’t really bother removing the dried out brown leaves. I figured that I’m going to be drying it anyway, so why waste the effort?

The leaves seemed less bitter than the stems, so I focused on those and tossed the stems out. I just sat down and stripped the frilly bits off each stem by pinching them and running my fingers down it.

This was my favorite part actually. Very meditative and satisfying.

I ended up with maybe around a cup and a half of leaves after I was finished. I forgot to actually weigh it though.

These were then spread on a dehydrator tray, along with a bunch of other things I’d foraged that day, and left to dry overnight at about 90 or 100 degrees F.

And after all that effort, the result was a pretty gross tea, at least to my tastebuds. It was really bitter with a strong medicinal/piney smell2actually though I’d describe IPAs in the same way and a lot of people seem to like those, so maybe some people would really enjoy this tea.. My partner didn’t hate it as much as I did, so take my opinion with a grain of salt. Could be something you develop a taste for. I could also see some potential usecase where you add this to a sweet tea blend to balance it out maybe.

FORAGING SCORE: 9 / 25

VERDICT: bitter and medicinal, hard pass.

ease of harvesting
/ preparation
4 / 5
some effort but it was pretty chill, I liked the process of removing the leaves
edibility2 / 10
I can see this being good as a balancing element in an otherwise sweet tea. also maybe if you like bitter piney flavors you might dig this, idk.
overall enjoyment3 / 10
it’s quite pretty, I’ll probably plant some in my yard. but not for eating, for me anyway

footnotes

  • 1
    especially if it seems like a bad idea
  • 2
    actually though I’d describe IPAs in the same way and a lot of people seem to like those, so maybe some people would really enjoy this tea.

how I got into foraging

I’m pretty new to the world of botany. I started getting into plants last year, when my partner and I were staying at an airbnb near mount baker in the north cascades. It was early spring, and both of us as non-native-pacific-northwesterners had never really experienced a temperate rainforest before. I mean shit, neither of us even knew that rainforests existed outside of the tropics before we moved to this area. We were absolutely not prepared.

That weekend we wandered down a nearby trail, jaws dropped, in awe of how prehistoric everything looked. The moss covers every inch of available space, softening every sound in the same way as a freshly fallen snow. The sprawling ferns and massive trees make you feel small, but in a good way, in the kind of way that makes you feel comforted and safe knowing that these ancient giants have been here for ages, and will (I hope) continue to be there for many more ages to come.

Back at our cabin, in an attempt to stay ‘off the grid’ and avoid the urge to doomscroll through the news on my phone, I browsed the bookshelves. I’m pretty sure they didn’t expect anyone to actually read these books, by the way. This was the kind of bougie cabin where everything is pristine and curated, and every item arranged on the scandinavian-meets-mid-century wood furniture is chosen more for the aesthetic and vibe1and don’t forget, everything has to be “hygge”. describing your airbnb as hygge is like putting “I love to travel!” in your tinder profile. I mean, there’s nothing wrong with it (liking popular things is ok and you should never feel bad about it, fuck gatekeepers), but I do find it amusing sometimes. that it evokes rather than its content. One of those items was this antique 1940’s book about the native flora and fauna of the pacific northwest, which didn’t actually teach me anything about foraging2although it did teach me one of my favorite fun plant etymology facts. do you know where the word “daisy” comes from? Daisies bloom in the sun and close up their petals at night, so they were called “day’s eyes”, which was eventually smashed and shorted into just “daisies”. neat!, but it did make me stop and think, hey, aren’t some of those plants we just saw edible? fiddlehead ferns3raise your hand if you first learned about fiddlehead ferns from playing stardew valley. Yeah, me too. No shame. Everything you know had to be learned at one point. are a thing you can eat, right?

I was fascinated, and knew I’d just found a new target for my hyperfocus to fixate on and obsess over. After a quick google session and a couple of e-book purchases, I spent the next few hours consuming as much content about foraging as I could, ready to go out on the trail again and see if I could find any of these fiddleheads. We did find some of course – tons of them actually. Once I started paying attention, suddenly the forest came alive with fascinating discoveries. What used to look like a homogeneous blur of leaves and fuzzy moss suddenly became something so much more. I snapped pictures of every interesting plant I came across while we filled our pockets with fiddleheads.

Here’s a couple of my favorite shots.

This is a type of birds-nest fungi, and although they are not edible, they are absolutely fascinating nonetheless because of the way they reproduce. Like other fungi, they spread using spores, but it looks nothing like your typical umbrella-shaped toadstool. Look closely at the little cups, see how some have small black seed-shaped discs inside or around them4here’s a closeup:? Those are the spores, and they rely on the rain to distribute them. As the cup fills with water, the spore “seeds” get splashed out by raindrops, scattering them around. It’s a clever and fascinating reproductive method specifically adapted to this exact environment, and honestly I just think these little guys are ridiculously cute. Every time I spot some of them I have to stop and take a million close-up pictures, they’re just too damn cool.

Pacific Trillium is one of my favorite wildflowers. It pops up only briefly in the early days of spring, often disappearing before other wildflowers have even opened their blooms yet. There’s something about the simplicity and perfectly arranged layers of three leaves, three bracts, and three petals that I just find beautiful. But they are extremely fragile and should not be touched. Disturbing or plucking the flower can ruin its ability to photosynthesise, and can potentially kill the plant, preventing it from coming back next year.

When we got back to the cabin, we cooked up the fiddleheads we harvested and added them to the pasta dish we had planned to make for dinner. They did taste good, but that wasn’t really the only thing that hooked me on foraging. It was this crazy sense of discovery, of never knowing what you might find around the next trailbend. I told my partner that it felt like “adult easter egg hunting”.

Most of what I spotted wasn’t edible (or just wouldn’t be tasty), but I couldn’t believe how many fascinating plants and fungi there were to be found once you start actually looking closely. It’s not like I’d never hiked or camped before, I just never really paid attention. I didn’t dislike hiking, but I’d often get bored quickly and spend most of the hike lost in my thoughts, not really looking around, just mindlessly going forward.

Before that day, the woods were all the same to me.

Afterwards, they would never look the same again.

footnotes

  • 1
    and don’t forget, everything has to be “hygge”. describing your airbnb as hygge is like putting “I love to travel!” in your tinder profile. I mean, there’s nothing wrong with it (liking popular things is ok and you should never feel bad about it, fuck gatekeepers), but I do find it amusing sometimes.
  • 2
    although it did teach me one of my favorite fun plant etymology facts. do you know where the word “daisy” comes from? Daisies bloom in the sun and close up their petals at night, so they were called “day’s eyes”, which was eventually smashed and shorted into just “daisies”. neat!
  • 3
    raise your hand if you first learned about fiddlehead ferns from playing stardew valley. Yeah, me too. No shame. Everything you know had to be learned at one point.
  • 4
    here’s a closeup: