
here’s a fun little project I did this weekend after a goodwill trip. I wanted somewhere to hang my necklaces up in my bedroom, since I love wearing extra-long pendants and they are perpetually a tangled mess in my jewelry box. I had the idea of a sort of shadowbox type of thing that I could stick pins into and hang my necklaces on.

I’d had this project in the back of my mind for a while, so when I spotted this ugly-ass sign at goodwill that had a nice deep frame, I tossed it in my cart and was only mildly embarrassed to be seen purchasing it. seriously, I cannot tell you how much I dislike inspirational-quote-based home decor. so I was actually quite satisfied that I’d be able to turn it into something actually worth hanging up.

first things first, we need some kind of backing material that will be good for sticking pins into. cardboard is the simplest solution and as a bonus it’s essentially free, so I trimmed a piece of an old box to fit snugly into the frame.

then I needed to cover it with something that looks nice. I had this fabric scrap laying around that I got in one of those mismatched remnant grab bags you can get from fabric sellers sometimes. I love buying these cause you get a wide variety of fabrics that you might not have otherwise picked out, and you get to save something that would have probably been thrown out otherwise.

I laid out the cardboard on my fabric scrap and cut it about 1″ larger than the board on all sides, then wrapped it around the edges and clipped in place. in retrospect this was maybe a little bit too snug. it’s a pretty thick upholstery-type fabric, so I ended up needing to stretch it a bit tight and use a really small seam allowance. it worked out, but cutting a bit more extra would have made things easier.

I stitched around 3 of the 4 sides, just going straight through the cardboard – only broke one needle, so I was pretty happy with how well my sewing machine did on such a thick, layered object.

I wanted it to have a bit of depth to it, so I opened up the unstitched bottom edge and loosely filled it with a bit of stuffing. it came out a little on the lumpy side, so I’m thinking it would’ve been better to use a slab of batting or foam here instead. but stuffing was what I had on hand, so that’s what I used. after stuffing, I went back to the sewing machine and closed up the remaining edge.

finally, all that’s left is to put it all together. the covered board fits very snug in the frame so it actually holds quite well on its own, but as a little extra insurance I gave it a good spray with some tacky adhesive. I know I have some stronger spray adhesive laying around somewhere, but I couldn’t find it. the tacky spray turned out to be plenty strong enough though (well, it hasn’t fallen off yet at least).

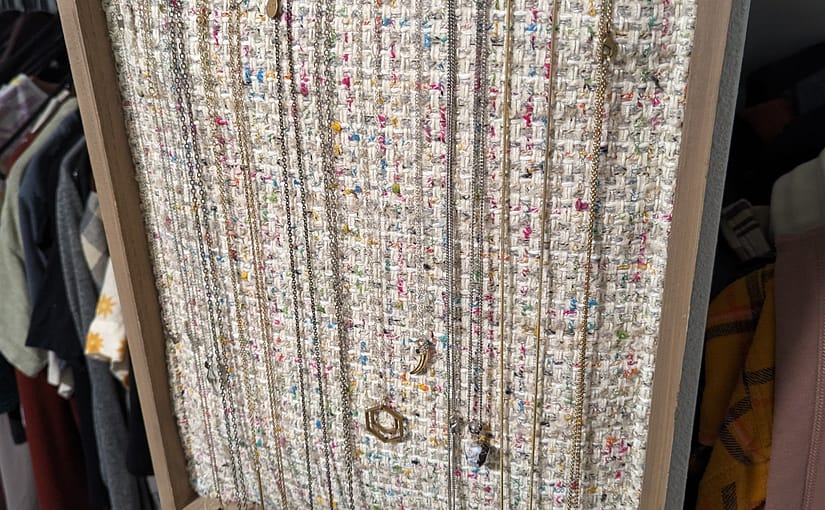
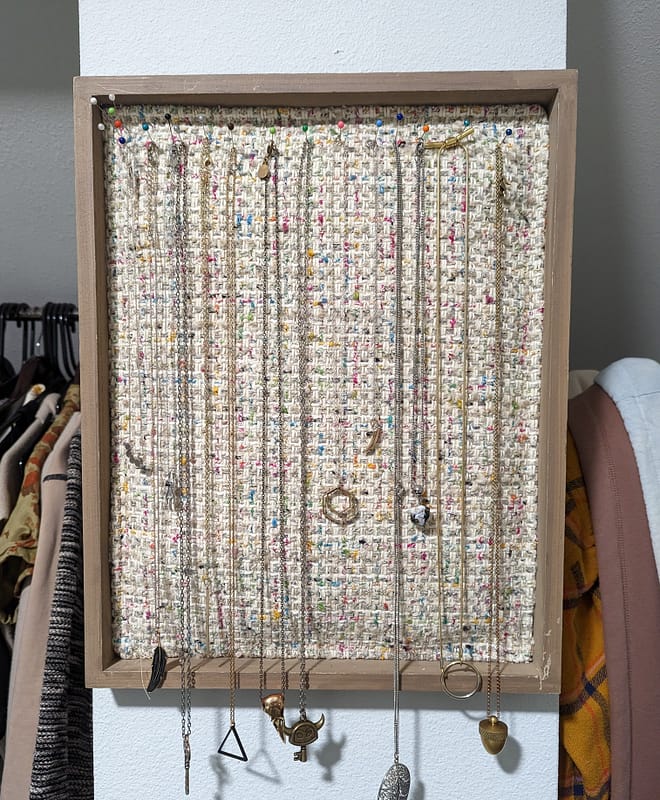
and here’s the finished product! turns out, my necklaces are way too long so they don’t actually all fit within the frame (bummer) but I think it looks pretty cool anyway! and it’s definitely way better than my old solution of throwing them all into a box and hoping they wouldn’t get too tangled. so I’ll be on the lookout for a larger deep frame to make another one at some point!
that’s all for now, thanks for reading 🙂