This is one of the first patterns I self-drafted. I’d been learning a lot of amigurumi techniques and wanted to try designing something myself. I had a bundle of cheap mini yarn balls that I’d gotten when I was just learning how to crochet that I’d barely used, since it’s a pretty low quality yarn and in such small amounts that it wasn’t really enough for most projects. So I sat there staring at them for a while and tried to challenge myself to make something with lots of small parts of different colors to use up as much of the yarn as possible.

I really enjoy these kinds of projects. It feels good to use something up that you already have instead of buying more things, and the constraints force you to be creative. What I came up with is this
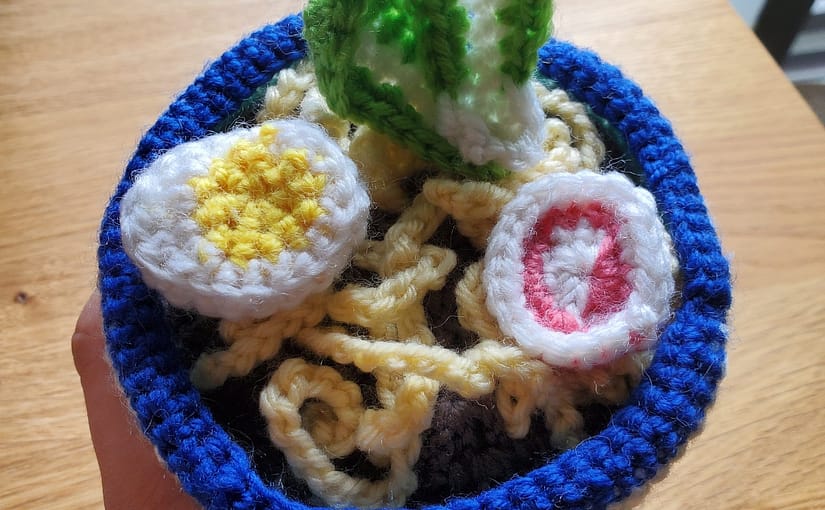
I really enjoy these kinds of projects. It feels good to use something up that you already have instead of buying more things, and the constraints force you to be creative. What I came up with is an amigurumi bowl of ramen noodles, topped with some mini bok choy, a fish cake, and an egg (: I think the bok choy leaves are my personal favorite.
Read on for the free pattern, or head over to the Etsy listing if you would like to support me by purchasing the downloadable PDF!

Ramen Bowl Amigurumi Pattern

Notes:
- This is a beginner / intermediate level pattern. I’ll assume that you’re familiar with basic stitches and techniques like increasing, decreasing, and working in the round.
- For the bowl, you can definitely choose other colors than what I used here – I just picked blue & white cause it’s what I had on hand.
- To keep color changes looking clean, always switch yarn on the last yarn-over of the previous stitch. For example, to switch from A to B on a single crochet, you’ll insert your hook, draw up a loop of color A, then swap to color B to yarn over and pull through.
- If you prefer a downloadable PDF of this pattern, you can purchase it here
Materials needed:
- Worsted weight yarn in several colors. I had one mini-ball (22yds) of each color to work with and ended up with some leftovers. Color list:
- Green
- White
- Pink
- Yellow
- Beige
- Brown
- Light blue*
- Dark blue*
- * These colors are used only for the bowl and can be replaced with any color(s) of your choice
- 4mm (size G) crochet hook
- Small handful of stuffing
- Tapestry needle for weaving in ends
- Stitch markers
Stitches & Abbreviations:
As with most amigurumi, this pattern is worked mostly in single crochet, with a few exceptions. Here’s the abbreviations and notation you should know (all stitches are in US terminology):
- Sl st – Slip stitch
- Ch – Chain stitch
- Sc – Single crochet
- Hdc – Half double crochet
- Dc – Double crochet
- Tr – Treble crochet
- Inc – Increase (two stitches in one loop)
- May be combined with a stitch type, for example HdcInc would be two Hdc in one loop. If no stitch is specified (just “Inc“), use single crochet.
- Dec – Decrease (one stitch across two loops)
- Same as increase, assume single crochet unless a stitch type is specified.
Additional markings & formatting:
- [ … ] – A group of stitches to be repeated
- Example: “[ Sc, Inc ] x2” means “Sc, Inc, Sc, Inc”
- {color} – Indicates which color to use. Lasts until a new color is specified.
- ( ##st ) – Total number of stitches that you should have in this row
- If the row starts with chain stitches, they are counted as one stitch
Parts list (click to skip to section):
Part 1: Bowl base
The bowl has two pieces – a base, and the bowl itself. The base is worked entirely in white yarn.

Row 1 (12st): Start with white yarn and make a magic ring. Make 3 chain stitches, then Dc x11 in the loop. Join the circle with a slip stitch and pull the loop end to tighten.
Row 2 (24st): Ch 3. Dc in the same st as the chains, then Dc twice in each stitch the rest of the way around (DcInc). Join with Sl st.
Row 3 (24st): Ch 1. In each stitch for the rest of the round, Sc in the front loop only. This will create a hard 90-degree edge for the bottom of the bowl base. Finish this row with a slip stitch to join.


Row 4 (24st): To add just a little more height, we’ll do one more plain single crochet round. Ch 1, Sc in each loop to the end of the round, join with Sl st. Finish off and leave a long tail of yarn for attaching this piece to the bowl later.
Part 2: Bowl dish
You can be a bit creative here if you like – I made a simple striped bowl since I didn’t have enough of any one color to make it solid, and I was pretty happy how it turned out. But feel free to do whatever color/design you’re comfortable with.

Unlike the previous piece, this one will be worked in the round, so we won’t be slip stitching to close each row. Stitch markers are really helpful here.
Row 1 (6st): {light blue} Make a magic ring. Make 6 Sc in the loop and pull the end to close.
Row 2 (12st): Make two sc in each stitch all the way around (Single crochet increase – referred to from here on as just “Inc”).
Row 3 (18st): [ Inc, Sc ] x 6
Row 4 (24st): Sc, [ Inc, Sc x2 ] x 5, Inc, Sc
Row 5 (30st): [ Inc, Sc x3 ] x 6
Row 6 (36st): Sc x2, [ Inc, Sc x4 ] x 5, Inc, Sc x2
Row 7 (42st): [ Inc, Sc x5 ] x 6
Row 8 (48st): Sc x3, [ Inc, Sc x6 ] x 5, Inc, Sc x3
Row 9 (54st): [ Inc, Sc x7 ] x 6
Row 10 (59st): [ Inc, Sc x10 ] x 4, Inc, Sc x9
Row 11 (63st): {white} Sc x7, [ Inc, Sc x14 ] x 3, Inc, Sc x6


Row 12 (63st): {light blue} Sc x63
Row 13 (66st): [ Sc x15, Inc ] x 3, Sc x15
Row 14 (66st): {white} Sc x66
Row 15 (69st): [ Sc x21, Inc ] x 3
Row 16 (69st): {light blue} Sc x69
Row 17 (69st): Sc x69
Row 18 (69st): {white} Sc x69
Row 19 (69st): {dark blue} Sc x69
Row 20 (69st): Sc x69. Finish off & weave in all ends, no need to leave any tail here.


Part 3: Soup broth
This one’s a pretty straightforward plain brown disc. We’ll use double crochet here to leave large enough gaps in the stitches that we can weave the noodles in and out of it later.

Row 1 (12st): Using brown yarn, make a magic ring. Make 3 chain stitches, then Dc x11 in the loop. Join the circle with a slip stitch and pull the loop end to tighten.
Row 2 (24st): Ch 3. Dc in the same st as the chain. In each stitch for the rest of the round, Dc twice in each loop (double crochet increase – referred to from here on as DcInc). Join with Sl st.
Row 3 (36st): Ch x3, Dc in same st as ch, Dc, [ DcInc, Dc ] x11, join with Sl st
Row 4 (48st): Ch x3, Dc in same st as ch, Dc x2, [ DcInc, Dc x2 ] x11, join with Sl st
Row 5 (60st): Ch x3, Dc in same st as ch, Dc x3, [ DcInc, Dc x3 ] x11, join with Sl st.

If you place the disc inside the bowl, it should fit pretty closely. A little difference is no big deal, but you can always add/remove rows if you really need to. Finish off and weave in any loose ends.
Part 4: Noodles
This is the simplest part, it’s just going to be a long chain. Take your beige yarn and start making chain stitches until you reach somewhere around 55″ (140cm) in length. For me this was about 300-350 chain stitches, but you don’t need to count exactly. Weave the loose end back into the chain when you’re done.

Part 5: Boiled egg

Row 1 (6st): {yellow} Make a magic ring. Make 6 Sc in the loop and pull the end to tighten.
Row 2 (12st): In each of the loops in this round, make an Increase.
Row 3 (20st): For this row we’ll use some taller stitches on one side of the yolk to extend it into more of an oblong shape.
Switch to {white} and do [ Sc, Inc ] x3. Then start making it taller: Sc, ScInc, then Hdc and Dc in the same loop, and finally a TrInc (treble crochet increase). Going back down we’ll do it in reverse: Dc and Hdc in the same loop, and finish with ScInc in the last loop.
Here’s the whole row in short notation if you find it easier to read:
[ Sc, Inc ] x3, Sc, Inc, Hdc & Dc (in same loop), TrInc, Dc & Hdc (in same loop), Inc


Row 4 (20st): In each stitch of the previous round, make a back-loop only Sc to create a corner edge.
Row 5 (10st): Make a single crochet decrease (Dec) across each pair of stitches from the previous round. At this point you can tuck any loose threads inside the body of the egg before you close it up further, so that you won’t have to weave them in.
Row 6 (5st): Decrease again across each pair of stitches (Dec x5)
Row 7 (2st): Make two more Dec, and at this point it should be closed off enough that you can just pull it tight and finish off. The back of the egg won’t be visible in the final product anyway, so it doesn’t need to be perfect. Leave a tail for attaching the egg to the bowl later.
Part 6: Baby bok choy (make 2)
We’ll be making two of these. Similar to the egg, we’ll use stitches of varying heights to create the shape of the leaf.

Row 1: {white} Ch x10
Row 2: Turn the work so you are working back down the chain. Starting in second loop on the hook, Sc x9. Ch x1 and turn.
Row 3: Start working in the second loop on the hook. Make 2 Sc and one Sl st, then switch to {green}.
Carrying the white yarn along, do: Sc x2, Hdc x2, Dc, Dc x3 in next loop (triple increase), repeat another Dc x3 in next loop, Dc, Hdc x2.
Pick up the {white} again. Sl st in next loop, then finish off with 2 Sc.


Repeat steps 1-3 to make a second one. Weave in all ends except for a tail of white yarn for attaching later.
Part 7: Fish cake
This piece is a little tricky if you’ve never done a spiral crochet before. You can find lots of great tutorials online if you get stuck, but I’ll do my best to describe the technique here.

Row 1: Start with {pink}. Make a magic ring and Sc x6 in the ring. Do not tighten it yet! Take your hook out of the loop, being careful not to tug on it and undo your stitches.
Draw up a loop of {white} in the ring and make 6 Sc next to the pink ones. Now you can pull the ring tight. You should end up with a half-white half-pink colored circle with two working loops on opposite sides.


Row 2: Put your hook in the {white} working loop. Make 6 Sc, one in each of the pink loops on the previous row. Then take your hook out and pick up the {pink} loop again.

In the next 6 stitches, do an ScInc. Then 3 regular Sc in the next three loops. We’re done with the pink now, so you can finish it off.
Row 3: Pick the remaining {white} loop back up. Sc x15 (until you’ve stitched across every pink loop). Make a Sl st to join to the next white loop on the previous row, and finish off. Weave in all ends except for a tail of white yarn for attaching later.
Part 8: Assembly
If you’ve made it this far congrats! Now time to see it all come together. If you haven’t already, make sure you’ve woven in all the loose ends except for any tails you’ll need to attach things together (one tail on the bowl base, the egg, the fish cake, and one on each bok choy).
Before & after weaving in loose ends:


The first step is to stitch the bowl base onto the dish. Center the base on the bottom of the dish, add a tiny bit of stuffing if you like (just not so much that it bubbles out and makes it wobble), and stitch around the base to attach it.

Next we’;; weave the noodles into the soup broth. For this I used my largest tapestry needle and treated the noodle chain as if it were one thick piece of yarn.
If you don’t have a needle large enough, you can also use your crochet hook to pull the noodle strand through the holes. Just go in and out of the broth piece at random, leaving lots of extra length to let the noodle strand curl and tangle itself on the top. Try to cover the broth mostly evenly.


Now, arrange and loosely stitch down the remaining toppings onto your noodles & broth. You don’t need to worry about weaving in any loose ends, since everything on the bottom will just be stuffed inside the bowl and won’t be visible.

Finally, get out some stuffing and some extra white yarn (or whatever color you used for the bowl). Fill the bowl with stuffing, cap it off with your broth & toppings disc, and then stitch the broth to the inside of the bowl all the way around. And you’re finished!


Hope you enjoyed the pattern, please leave a comment here or on the Ravelry page if you tried it out! I’d love to see your results.
You can also support me by checking out my Etsy shop for a downloadable copy of this pattern, plus more patterns and stuff I’ve made (: