crochet pattern: blink dagger [dota 2]

This post was originally written in 2020 and appeared on my old blog, daizedhandmade.blogspot.com. It has been updated and migrated here instead!

[Click to jump to the pattern]

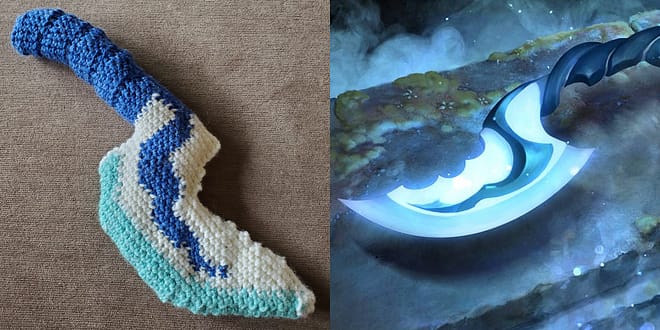
Today I’ll be sharing a crochet pattern for a plushie Blink Dagger. This is probably the most complex pattern I’ve ever designed in terms of shaping, but the stitches that it uses are very simple, so it evens out (:

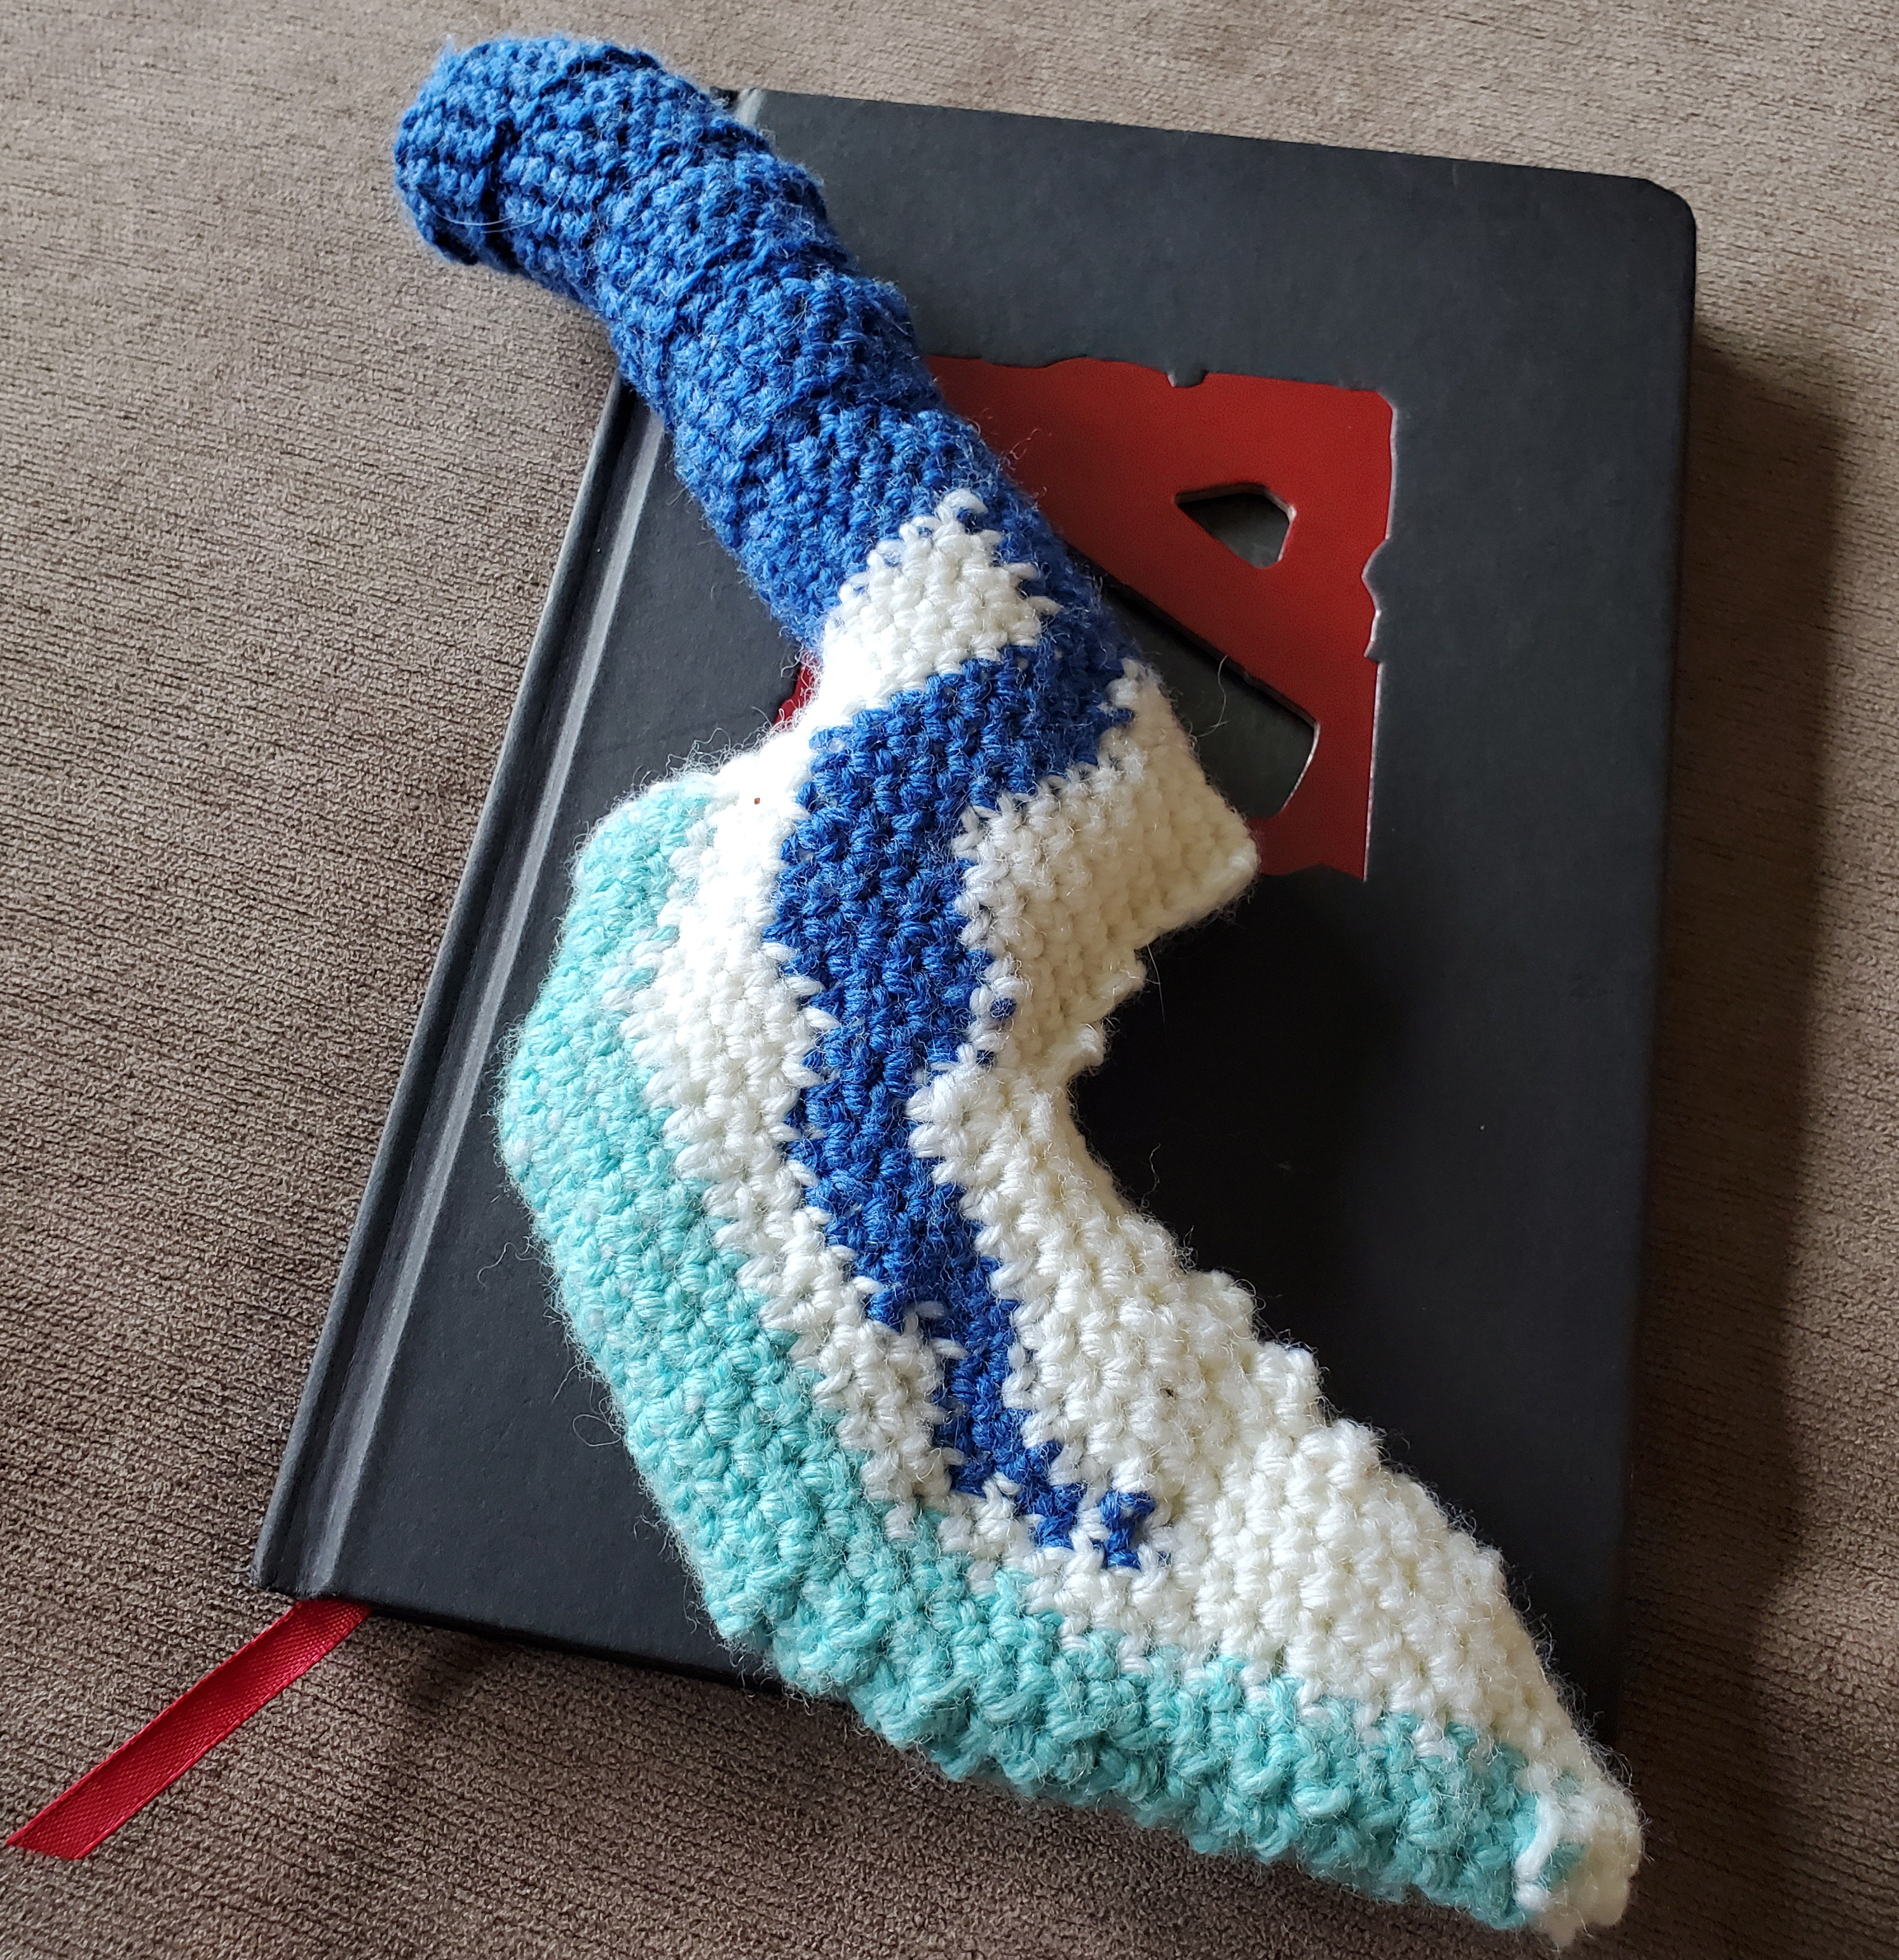
My goal was to make this in one continuous piece, without any of the tediousness of stitching together many separate parts like a lot of amigurumi projects – just pure crochet. While I feel like there’s a lot of room for improvement here, I’m quite happy with the result.

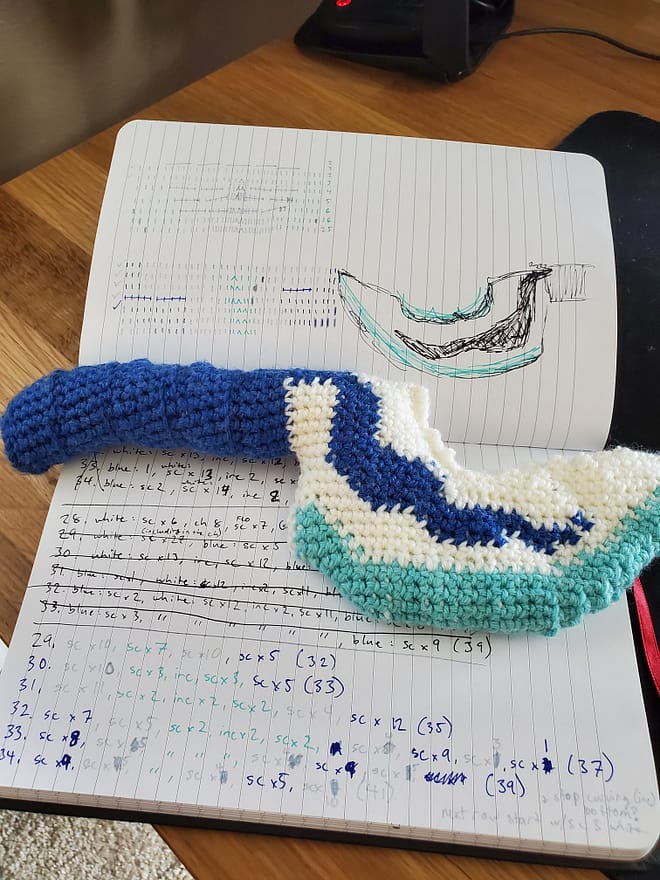
Some of the shapes, in particular the place where the handle meets the blade, took me hours of attempting and unraveling to try and get it to look just right (you can see how many crossed out rows I’ve got in the photo – there’s several more pages of that).

Even though I might have bitten off a little more than I could chew with this project, I think I learned a lot! So, let’s get on to the pattern itself:


Dota 2 Blink Dagger Crochet Pattern

Note: This is an intermediate level pattern. You should be familiar with basic amigurumi techniques and comfortable with color switching.

What you’ll need:

  • Medium weight yarn in three colors: Blue, White, and Light Blue (I used Cascade Superwash 220, gauge 5 – 5.5 single crochet per inch)
  • 4.5mm crochet hook
  • Polyfill stuffing
  • Tapestry needle for weaving in ends
  • Stitch markers

Stitches & Abbreviations:

As with most amigurumi, this pattern is worked mainly in single crochet. Here’s the abbreviations and notation I’ll be using:

MR – Magic ring
Slst – Slip stitch
Ch – Chain stitch
Sc – Single crochet
Inc – Single crochet increase
Dec – Single crochet decrease
FLO Sc – Front loop only single crochet
BLO Sc – Back loop only single crochet
[ …. ] – Indicates a group to be repeated (eg. [ Sc, Inc ] x2 means Sc, Inc , Sc, Inc)

Curly braces before a stitch indicate a color change (lasts until a new color is specified):

{W} Stitch in white
{B} Stitch in blue
{LB} Stitch in light blue

Notes:

To keep color changes looking clean, always switch yarn on the last yarn-over of the previous stitch. For example, to switch on a single crochet, you’ll insert your hook, draw up a loop of color A, then swap to color B to yarn over and pull through.

Whether or not to carry yarn along after switching colors: You can either carry along the other colors if you don’t mind a bit showing through, or leave them loose on the inside of the project since it won’t be visible anyway. Just make sure not to pull the strands too tight or you’ll find it impossible to get any stuffing in there later.

If the shape isn’t looking right: Since we’re working in a continuous spiral, this pattern can end up slightly twisted to one side as you work. I recommend using a bit of needle sculpting to get it back in line.

Pattern:

Row 1 (6 stitches): Start with dark blue yarn and make a magic loop. In the loop, make 6 single crochet. Join with a slip stitch.

Row 2 (12st): Inc x6, join with Slst

Row 3 (18st): [Sc, Inc] x6, join with Slst

Row 4 (18st): Sc x18 in front loop only. This will give some definition to the edge, like so:

Do not join this row – from now we’ll start working in one continuous spiral.

Row 5 (18st): Sc x3, Dec x2, Sc x6, Inc x2, Sc x3
By increasing on one side and decreasing the other, the tube we’re making will start to angle towards one side. This’ll help create the crooked shape of the handle.

Row 6 (18st): Sc x18

Row 7 (18st): Sc x4, Dec, Sc x7, Inc, Sc x4

Row 8 (18st): FLO Sc x18

Row 9 (18st): BLO Sc x18

Alternating between front loop and back loop only here will create a ridge that works to separate the handle into multiple segments. This will be repeated a few times later.

Rows 10 – 12 (18st): Sc x18

Row 13 (18st): FLO Sc x18

Row 14 (18st): BLO Sc x18

Row 15 (18st): Sc x3, Inc x2, Sc x6, Dec x2, Sc x3

Rows 16 – 17 (18st): Sc x18

Rows 18-20 (18st): Repeat rows 13 through 15

Rows 21 – 22 (18st): Sc x18

Row 23 (18st): FLO Sc x18

Row 24 (18st): BLO Sc x18

Rows 25 – 27 (18st): Sc x18
This is the last section of the handle. Things will get more tricky from here on. We’ll be introducing two new colors, so get out your white and light blue yarn and let’s continue.

From here on I’ll be using {W}, {B}, and {LB} to indicate white, blue, and light blue yarn respectively.

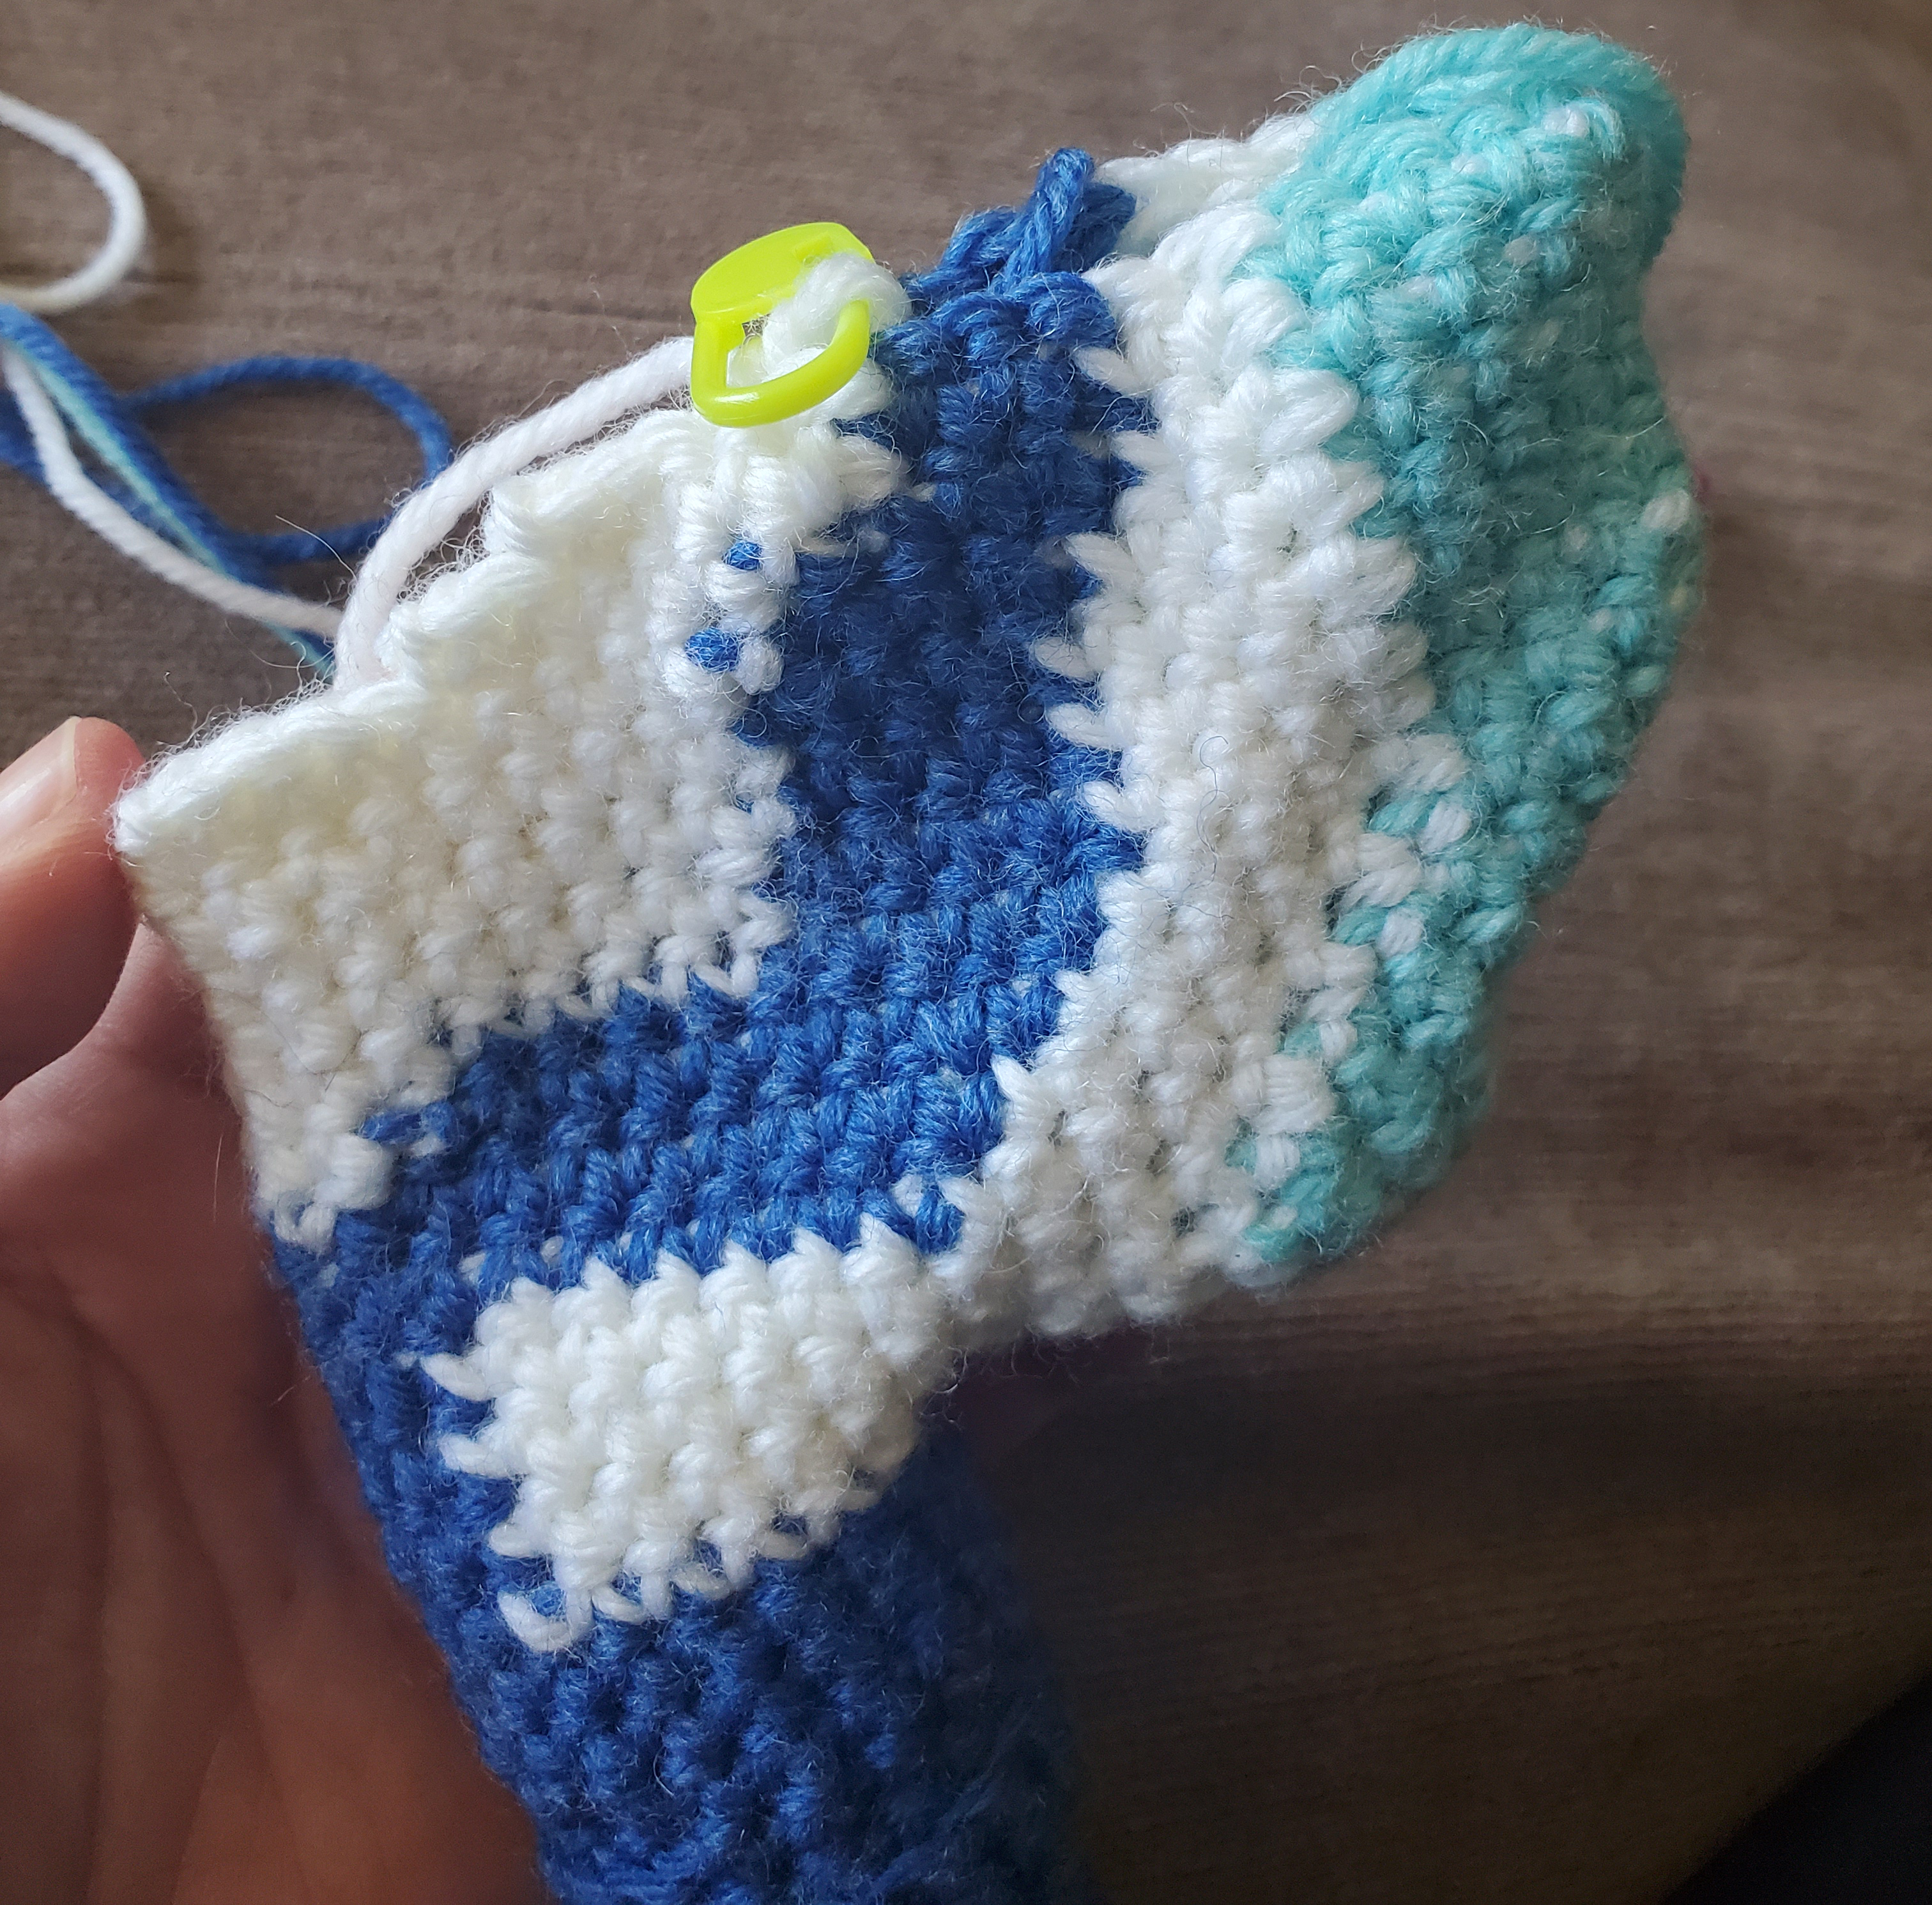
Row 28 (32st): {W} Sc x6, Ch 8, then turn and Sc x7 back down the front loops of the chain. Sc x6 on the handle base, leaving 1 loop empty when you rejoin (the loop next to where you started to chain). Finish the row with {B} Sc x5.

You should end up with a stringy bit of white sticking off your handle that you’ll start to build the blade off of. Here’s a picture description to help explain:

Row 29 (32st): {W} Sc x10, {LB} Sc x7, {W} Sc x10, {B} Sc x5

Row 30 (33st): {W} Sc x10, {LB} Sc x3, Inc, Sc x3, {W} Sc x10, {B} Sc x5

Row 31 (35st): {W} Sc x11, {LB} Sc x2, Inc x2, Sc x2, {W} Sc x4, {B} Sc x12

Row 32 (37st): {B} Sc x7, {W} Sc x5, {LB} Sc x2, Inc x2, Sc x2, {W} Sc x4, {B} Sc x9, {W} Sc x3, {B} Sc x1

Row 33 (39st): {B} Sc x8, {W} Sc x5, {LB} Sc x2, Inc x2, Sc x2, {W} Sc x4, {B} Sc x9, {W} Sc x5

Row 34 (41st): {B} Sc x9, {W} Sc x5, {LB} Sc x2, Inc x2, Sc x2, {W} Sc x4, {B} Sc x5, {W} Sc x10

Row 35 (41st): {W} Sc x5, {B} Sc x5, {W} Sc x4, {LB} Sc x8, {W} Sc x4, {B} Sc x5, {W} Sc x10

Row 36 (41st): {W} Sc x5, {B} Sc x5, {W} Sc x4, {LB} Sc x8, {W} Sc x4, {B} Sc x4, {W} Sc x11

Row 37 (41st): {W} Sc x6, {B} Sc x4, {W} Sc x4, {LB} Sc x8, {W} Sc x4, {B} Sc x4, {W} Sc x11
 
We’re about to start really shaping the blade now, so this is a good time to stuff your handle. I didn’t stuff mine overly full, since I didn’t want it to stretch out so much that you wouldn’t be able to see the shape detailing anymore, but if you want yours to be more sturdy and less floppy you can add extra stuffing to give it more structure.

Row 38 (41st): {W} Sc x6, {B} Sc x4, {W} Sc x4, {LB} Sc x8, {W} Sc x3, {B} Sc x4, {W} Sc x10, turn and Sc across both the current loop and the one on the opposite row to close it up, 2 times. Here’s what that will look like:

Row 39 (35st): {W} Sc across x2, Sc x5, {B} Sc x4, {W} Sc x3, {LB} Sc x8, {W} Sc x2, {B} Sc x3, {W} Sc x7, Ch

Row 40 (31st): {W} Sc across x2, Sc x5, {B} Sc x3, {W} Sc x2, {LB} Sc x8, {W} Sc x2, {B} Sc x3, {W} Sc x5, Ch

Row 41 (26st): {W} Sc across x2, Sc x3, {B} Sc x3, {W} Sc x2, {LB} Sc x8, {W} Sc x3, {B} Sc x3, {W} Sc x2
We’ve now closed up about half the blade, giving it a jagged chunked-out look:

Row 42 (25st): {W} Sc x4, {B} Sc x3, {W} Sc x2, {LB} Sc x8, {W} Sc x2, {B} Sc x3, {W} Sc x3

Row 43 (25st): {W} Sc x4, {B} Sc x3, {W} Sc x2, {LB} Sc x8, {W} Sc x2, {B} Sc x3, {W} Sc x3

Row 44 (27st): {W} Sc x4, {B} Sc x3, {W} Sc x2, {LB} Sc x8, {W} Sc x3, {B} Sc x2, {W} Sc x3, Ch x2, turn

The chain stitches at the end will be the basis of a chunked increase that will raise the top of the blade gradually back up in line with the handle.

Row 45 (26st): {W} Sc in chain, skip a loop then Sc x3, {B} Sc x2, {W} Sc x3, {LB} Sc x8, {W} Sc x3, {B} Sc x2, {W} Sc x4
The empty loop here will be next to where you started the chain on the previous row (similar to what we did back on row 28 when creating the base of the blade)

Row 46 (29st): {W} Sc x5, {B} Sc x2, {W} Sc x3, {LB} Sc x8, {W} Sc x2, {B} Sc x2, {W} Sc x5, Ch x2

Row 47 (28st): {W} Sc in chain, skip a loop then Sc x5, {B} Sc x2, {W} Sc x2, {LB} Sc x8, {W} Sc x2, {B} Sc x2, {W} Sc x6

Row 48 (28st): {W} Sc x6, {B} Sc x2, {W} Sc x2, {LB} Sc x2, Dec x2, Sc x3, {W} Sc x2, {B} Sc, {W} Sc x6, Ch x2

Row 49 (27st): {W} Sc in chain, skip a loop then Sc x5, {B} Sc, {W} Sc x2, {LB} Sc x8, {W} Sc x2, {B} Sc, {W} Sc x7

Row 50 (27st): {W} Sc x6, {B} Sc, {W} Sc x2, {LB} Sc x2, Dec x2, Sc x3, {W} Sc x2, {B} Sc, {W} Sc x6, Ch x2

Row 51 (25st): {W} Sc in chain, skip a loop then Sc x4, {B} Sc, {W} Sc x2, {LB} Sc x8, {W} Sc x2, {B} Sc, {W} Sc x6
After this row, we’re finished with the dark blue. Cut the yarn and weave in the loose end. This is also a good time to loosely stuff the blade to give it a little structure and shape. Be careful not to overstuff, since you want it to lay fairly flat and not make it too round or cylindrical.

Row 52 (24st): {W} Sc x8, {LB} Sc x2, Dec x2, Sc x3, {W} Sc x7, Ch x2

Row 53 (22st): {W} Sc in chain, skip a loop then Sc x7, {LB} Sc x2, Dec x2, Sc x3, {W} Sc x7

Row 54 (22st): {W} Sc x7, {LB} Sc x2, Dec x2, Sc x3, {W} Sc x6, Ch x2

Row 55 (19st): {W} Sc in chain, skip a loop then Sc x5, {LB} Sc x2, Dec x2, Sc x3, {W} Sc x6

Row 56 (18st): {W} Sc x6, {LB} Sc x2, Dec x2, Sc x3, {W} Sc x5

Row 57 (16st): {W} Sc x5, {LB} Sc x2, Dec x2, Sc x3, {W} Sc x4

Row 58 (14st): {W} Sc x4, {LB} Sc x2, Dec x2, Sc x3, {W} Sc x3

Row 59 (12st): {W} Sc x3, {LB} Sc x2, Dec x2, Sc x3, {W} Sc x2
Stuff the remainder of the blade after this row, it’ll soon be too small to get any stuffing in.

Row 60 (10st): {W} Sc x2, {LB} Sc x2, Dec x2, Sc x2, {W} Sc x2

Row 61 (8st): {W} Sc x2, {LB} Sc, Dec x2, Sc, {W} Sc x2

Row 62 (6st): {W} Sc x2, {LB} Sc, Dec {W} Sc x2
Last chance to put a little bit more stuffing in the tip! You can also cut the light blue yarn and weave in the end here, since we won’t be using it anymore.

Row 63 (3st): {W} Dec x3

Row 64 (1st): {W} Dec across the remaining 3 loops to close up. Finish off and weave in the end of the yarn. At this point you can clean up the shape a little bit with some needle sculpting if needed. And it’s done!

Hope you enjoyed the pattern, if you make this please let me know and show me some pictures! If you have any questions or if anything is unclear just leave a comment.

And it’d be super neat if you check out my Etsy shop at DaizedHandmade for more patterns and stuff I made (:

ramen noodle bowl amigurumi (free crochet pattern)

Click to skip to pattern

This is one of the first patterns I self-drafted. I’d been learning a lot of amigurumi techniques and wanted to try designing something myself. I had a bundle of cheap mini yarn balls that I’d gotten when I was just learning how to crochet that I’d barely used, since it’s a pretty low quality yarn and in such small amounts that it wasn’t really enough for most projects. So I sat there staring at them for a while and tried to challenge myself to make something with lots of small parts of different colors to use up as much of the yarn as possible.

I really enjoy these kinds of projects. It feels good to use something up that you already have instead of buying more things, and the constraints force you to be creative. What I came up with is this

I really enjoy these kinds of projects. It feels good to use something up that you already have instead of buying more things, and the constraints force you to be creative. What I came up with is an amigurumi bowl of ramen noodles, topped with some mini bok choy, a fish cake, and an egg (: I think the bok choy leaves are my personal favorite.

Read on for the free pattern, or head over to the Etsy listing if you would like to support me by purchasing the downloadable PDF!

Ramen Bowl Amigurumi Pattern

Notes:

  • This is a beginner / intermediate level pattern. I’ll assume that you’re familiar with basic stitches and techniques like increasing, decreasing, and working in the round.
  • For the bowl, you can definitely choose other colors than what I used here – I just picked blue & white cause it’s what I had on hand.
  • To keep color changes looking clean, always switch yarn on the last yarn-over of the previous stitch. For example, to switch from A to B on a single crochet, you’ll insert your hook, draw up a loop of color A, then swap to color B to yarn over and pull through.
  • If you prefer a downloadable PDF of this pattern, you can purchase it here

Materials needed:

  • Worsted weight yarn in several colors. I had one mini-ball (22yds) of each color to work with and ended up with some leftovers. Color list:
    • Green
    • White
    • Pink
    • Yellow
    • Beige
    • Brown
    • Light blue*
    • Dark blue*
      • * These colors are used only for the bowl and can be replaced with any color(s) of your choice
  • 4mm (size G) crochet hook
  • Small handful of stuffing
  • Tapestry needle for weaving in ends
  • Stitch markers

Stitches & Abbreviations:

As with most amigurumi, this pattern is worked mostly in single crochet, with a few exceptions. Here’s the abbreviations and notation you should know (all stitches are in US terminology):

  • Sl st – Slip stitch
  • Ch – Chain stitch
  • Sc – Single crochet
  • Hdc – Half double crochet
  • Dc – Double crochet
  • Tr – Treble crochet
  • Inc – Increase (two stitches in one loop)
    • May be combined with a stitch type, for example HdcInc would be two Hdc in one loop. If no stitch is specified (just “Inc“), use single crochet.
  • Dec – Decrease (one stitch across two loops)
    • Same as increase, assume single crochet unless a stitch type is specified.

Additional markings & formatting:

  • [ … ] – A group of stitches to be repeated
    • Example: “[ Sc, Inc ] x2” means “Sc, Inc, Sc, Inc”
  • {color} – Indicates which color to use. Lasts until a new color is specified.
  • ( ##st ) – Total number of stitches that you should have in this row
    • If the row starts with chain stitches, they are counted as one stitch

Part 1: Bowl base

The bowl has two pieces – a base, and the bowl itself. The base is worked entirely in white yarn.

Row 1 (12st): Start with white yarn and make a magic ring. Make 3 chain stitches, then Dc x11 in the loop. Join the circle with a slip stitch and pull the loop end to tighten.

Row 2 (24st): Ch 3. Dc in the same st as the chains, then Dc twice in each stitch the rest of the way around (DcInc). Join with Sl st.

Row 3 (24st): Ch 1. In each stitch for the rest of the round, Sc in the front loop only. This will create a hard 90-degree edge for the bottom of the bowl base. Finish this row with a slip stitch to join.

Row 4 (24st): To add just a little more height, we’ll do one more plain single crochet round. Ch 1, Sc in each loop to the end of the round, join with Sl st. Finish off and leave a long tail of yarn for attaching this piece to the bowl later.

Part 2: Bowl dish

You can be a bit creative here if you like – I made a simple striped bowl since I didn’t have enough of any one color to make it solid, and I was pretty happy how it turned out. But feel free to do whatever color/design you’re comfortable with.

Unlike the previous piece, this one will be worked in the round, so we won’t be slip stitching to close each row. Stitch markers are really helpful here.

Row 1 (6st): {light blue} Make a magic ring. Make 6 Sc in the loop and pull the end to close.

Row 2 (12st): Make two sc in each stitch all the way around (Single crochet increase – referred to from here on as just “Inc”).

Row 3 (18st): [ Inc, Sc ] x 6

Row 4 (24st): Sc, [ Inc, Sc x2 ] x 5, Inc, Sc

Row 5 (30st): [ Inc, Sc x3 ] x 6

Row 6 (36st): Sc x2, [ Inc, Sc x4 ] x 5, Inc, Sc x2

Row 7 (42st): [ Inc, Sc x5 ] x 6

Row 8 (48st): Sc x3, [ Inc, Sc x6 ] x 5, Inc, Sc x3

Row 9 (54st): [ Inc, Sc x7 ] x 6

Row 10 (59st): [ Inc, Sc x10 ] x 4, Inc, Sc x9

Row 11 (63st): {white} Sc x7, [ Inc, Sc x14 ] x 3, Inc, Sc x6

Row 12 (63st): {light blue} Sc x63

Row 13 (66st): [ Sc x15, Inc ] x 3, Sc x15

Row 14 (66st): {white} Sc x66

Row 15 (69st): [ Sc x21, Inc ] x 3

Row 16 (69st): {light blue} Sc x69

Row 17 (69st): Sc x69

Row 18 (69st): {white} Sc x69

Row 19 (69st): {dark blue} Sc x69

Row 20 (69st): Sc x69. Finish off & weave in all ends, no need to leave any tail here.

Part 3: Soup broth

This one’s a pretty straightforward plain brown disc. We’ll use double crochet here to leave large enough gaps in the stitches that we can weave the noodles in and out of it later.

Row 1 (12st): Using brown yarn, make a magic ring. Make 3 chain stitches, then Dc x11 in the loop. Join the circle with a slip stitch and pull the loop end to tighten.

Row 2 (24st): Ch 3. Dc in the same st as the chain. In each stitch for the rest of the round, Dc twice in each loop (double crochet increase – referred to from here on as DcInc). Join with Sl st.

Row 3 (36st): Ch x3, Dc in same st as ch, Dc, [ DcInc, Dc ] x11, join with Sl st

Row 4 (48st): Ch x3, Dc in same st as ch, Dc x2, [ DcInc, Dc x2 ] x11, join with Sl st

Row 5 (60st): Ch x3, Dc in same st as ch, Dc x3, [ DcInc, Dc x3 ] x11, join with Sl st.

If you place the disc inside the bowl, it should fit pretty closely. A little difference is no big deal, but you can always add/remove rows if you really need to. Finish off and weave in any loose ends.

Part 4: Noodles

This is the simplest part, it’s just going to be a long chain. Take your beige yarn and start making chain stitches until you reach somewhere around 55″ (140cm) in length. For me this was about 300-350 chain stitches, but you don’t need to count exactly. Weave the loose end back into the chain when you’re done.

Part 5: Boiled egg

Row 1 (6st): {yellow} Make a magic ring. Make 6 Sc in the loop and pull the end to tighten.

Row 2 (12st): In each of the loops in this round, make an Increase.

Row 3 (20st): For this row we’ll use some taller stitches on one side of the yolk to extend it into more of an oblong shape.

Switch to {white} and do [ Sc, Inc ] x3. Then start making it taller: Sc, ScInc, then Hdc and Dc in the same loop, and finally a TrInc (treble crochet increase). Going back down we’ll do it in reverse: Dc and Hdc in the same loop, and finish with ScInc in the last loop.

Here’s the whole row in short notation if you find it easier to read:
[ Sc, Inc ] x3, Sc, Inc, Hdc & Dc (in same loop), TrInc, Dc & Hdc (in same loop), Inc

Row 4 (20st): In each stitch of the previous round, make a back-loop only Sc to create a corner edge.

Row 5 (10st): Make a single crochet decrease (Dec) across each pair of stitches from the previous round. At this point you can tuck any loose threads inside the body of the egg before you close it up further, so that you won’t have to weave them in.

Row 6 (5st): Decrease again across each pair of stitches (Dec x5)

Row 7 (2st): Make two more Dec, and at this point it should be closed off enough that you can just pull it tight and finish off. The back of the egg won’t be visible in the final product anyway, so it doesn’t need to be perfect. Leave a tail for attaching the egg to the bowl later.

Part 6: Baby bok choy (make 2)

We’ll be making two of these. Similar to the egg, we’ll use stitches of varying heights to create the shape of the leaf.

Row 1: {white} Ch x10

Row 2: Turn the work so you are working back down the chain. Starting in second loop on the hook, Sc x9. Ch x1 and turn.

Row 3: Start working in the second loop on the hook. Make 2 Sc and one Sl st, then switch to {green}.

Carrying the white yarn along, do: Sc x2, Hdc x2, Dc, Dc x3 in next loop (triple increase), repeat another Dc x3 in next loop, Dc, Hdc x2.

Pick up the {white} again. Sl st in next loop, then finish off with 2 Sc.

Repeat steps 1-3 to make a second one. Weave in all ends except for a tail of white yarn for attaching later.

Part 7: Fish cake

This piece is a little tricky if you’ve never done a spiral crochet before. You can find lots of great tutorials online if you get stuck, but I’ll do my best to describe the technique here.

Row 1: Start with {pink}. Make a magic ring and Sc x6 in the ring. Do not tighten it yet! Take your hook out of the loop, being careful not to tug on it and undo your stitches.

Draw up a loop of {white} in the ring and make 6 Sc next to the pink ones. Now you can pull the ring tight. You should end up with a half-white half-pink colored circle with two working loops on opposite sides.

Row 2: Put your hook in the {white} working loop. Make 6 Sc, one in each of the pink loops on the previous row. Then take your hook out and pick up the {pink} loop again.

In the next 6 stitches, do an ScInc. Then 3 regular Sc in the next three loops. We’re done with the pink now, so you can finish it off.

Row 3: Pick the remaining {white} loop back up. Sc x15 (until you’ve stitched across every pink loop). Make a Sl st to join to the next white loop on the previous row, and finish off. Weave in all ends except for a tail of white yarn for attaching later.

Part 8: Assembly

If you’ve made it this far congrats! Now time to see it all come together. If you haven’t already, make sure you’ve woven in all the loose ends except for any tails you’ll need to attach things together (one tail on the bowl base, the egg, the fish cake, and one on each bok choy).

Before & after weaving in loose ends:

The first step is to stitch the bowl base onto the dish. Center the base on the bottom of the dish, add a tiny bit of stuffing if you like (just not so much that it bubbles out and makes it wobble), and stitch around the base to attach it.

Next we’;; weave the noodles into the soup broth. For this I used my largest tapestry needle and treated the noodle chain as if it were one thick piece of yarn.

If you don’t have a needle large enough, you can also use your crochet hook to pull the noodle strand through the holes. Just go in and out of the broth piece at random, leaving lots of extra length to let the noodle strand curl and tangle itself on the top. Try to cover the broth mostly evenly.

Now, arrange and loosely stitch down the remaining toppings onto your noodles & broth. You don’t need to worry about weaving in any loose ends, since everything on the bottom will just be stuffed inside the bowl and won’t be visible.

Finally, get out some stuffing and some extra white yarn (or whatever color you used for the bowl). Fill the bowl with stuffing, cap it off with your broth & toppings disc, and then stitch the broth to the inside of the bowl all the way around. And you’re finished!

Hope you enjoyed the pattern, please leave a comment here or on the Ravelry page if you tried it out! I’d love to see your results.

You can also support me by checking out my Etsy shop for a downloadable copy of this pattern, plus more patterns and stuff I’ve made (: